In this article, we’ll delve into Terraform state locking using DynamoDB (LockID) and an S3 Bucket, exploring how this combination ensures safe and concurrent infrastructure modifications in collaborative environments.
Table of Contents
What is Terraform State File?
The Terraform state file, typically named “terraform.tfstate,” is a crucial artifact that stores the current state of deployed infrastructure. It contains a snapshot of resource attributes and their relationships as defined in the Terraform configuration.
This file enables Terraform to track changes, synchronize with the actual infrastructure, and facilitate accurate updates or modifications when the configuration evolves. Proper management of the state file is essential for maintaining consistency and ensuring effective collaboration in infrastructure as code projects.
What is the purpose of the State File in Terraform?
The Terraform state file maintains the current state of managed infrastructure, enabling accurate tracking, preventing concurrent conflicts, and facilitating recovery and rollbacks in case of errors. It also stores resource metadata and output values for effective resource management.
Key Purpose of State File in Terraform:
- State Tracking: Keeps track of the current state of managed infrastructure resources.
- Concurrency Control: Prevents conflicts by locking the state during concurrent operations.
- Resource Metadata: Stores metadata for each resource, aiding in accurate management and updates.
- Output Values: Records the current values of defined outputs for querying post-deployment.
- Recovery and Rollbacks: Facilitates recovery from errors and rollbacks by storing previous infrastructure states.
What is AWS S3?
AWS S3 (Simple Storage Service) is a scalable object storage service provided by Amazon Web Services (AWS). It allows you to store and retrieve any amount of data from anywhere on the web. S3 is commonly used for storing backups, media files, static assets for websites, and data lakes.
For example, you can use AWS S3 to store images for a web application. Your application can upload images to an S3 bucket, and users can download these images from the bucket when viewing your website.
What is DynamoDB?
DynamoDB is a fully managed NoSQL database service provided by AWS. It is designed for applications that require low-latency and seamless scalability. DynamoDB is known for its performance, reliability, and automatic scaling capabilities.
For example, you can use DynamoDB to store user data for a mobile app. The app can store user profiles, preferences, and other information in a DynamoDB table, and DynamoDB will automatically scale to handle increasing loads as the app gains more users.
Pre-Requisites
- An active AWS Account.
- AWS CLI configured with administrative privileges.
- Terraform installation completed on your local system.
Terraform State File Example
I’m using Terraform to set up an EC2 instance as an example to better understand how state files work.
Here is the main.tf file.
resource "aws_instance" "terraform-state-test" {
  ami = "ami-007020fd9c84e18c7"
  instance_type = "t2.micro"
  key_name = "Apache_kafka_key"
  tags = {
    Name = "terraform-state-test"
  }
}
This will create a t2.micro ubuntu instance on the AWS in the ap-south-1 region
Initialize the Terraform code.
terraform initTo look at the preview of the infrastructure
terraform planLets apply the configuration and create the instance.
terraform applyOnce the infrastructure is deployed, we can see the generated state file in the current directory as shown below.

Let’s view what is inside the state file:
{
  "version": 4,
  "terraform_version": "1.6.3",
  "serial": 1,
  "lineage": "d0517783-1010-e390-00e8-f6df46380ba3",
  "outputs": {},
  "resources": [
    {
      "mode": "managed",
      "type": "aws_instance",
      "name": "terraform-state-test",
      "provider": "provider[\"registry.terraform.io/hashicorp/aws\"]",
      "instances": [
        {
          "schema_version": 1,
          "attributes": {
            "ami": "ami-007020fd9c84e18c7",
            "arn": "arn:aws:ec2:ap-south-1:908198849120:instance/i-04764d340e19ee61a",
            "associate_public_ip_address": true,
            "availability_zone": "ap-south-1b",
            "capacity_reservation_specification": [
              {
                "capacity_reservation_preference": "open",
                "capacity_reservation_target": []
              }
            ],
            "cpu_core_count": 1,
            "cpu_options": [
              {
                "amd_sev_snp": "",
                "core_count": 1,
                "threads_per_core": 1
              }
            ],

The state file snippet provided here is a condensed version; the complete state file is extensive and contains confidential data.
What is Terraform Remote State & State Lock?
Terraform Remote State refers to storing Terraform’s state file, which contains the current state of your infrastructure, remotely rather than locally on your machine. This allows for collaboration among team members and ensures consistent state management across environments.
State Locking is a mechanism that prevents concurrent modifications to the state file, ensuring data integrity and avoiding conflicts in collaborative environments.
For example, imagine you have a Terraform project deployed in AWS. Instead of storing the state file on your local machine, you can configure Terraform to store it remotely in an S3 bucket and use DynamoDB for state locking. This setup ensures that all team members have access to the latest state of the infrastructure and prevents simultaneous changes that could lead to conflicts.
For example, when the developer X executes the terraform code, DynamoDB will lock the state and developer Y should wait until the execution is completed.

Steps for Managing Remote State File Using S3 and DynamoDB
Summary View of Terraform File:

Step#1:Create S3 bucket using Terraform
To begin, let’s create an S3 bucket using Terraform.
Utilizing a remote backend for the state file offers significant benefits, including built-in encryption and versioning capabilities.
Below is the Terraform code snippet to provision an S3 bucket with versioning enabled to safeguard the state file from accidental overrides. Remember to replace ‘terraform-state-bucket’ with a unique bucket name.”
S3_bucket.tf
provider "aws" {
  region = "ap-south-1"
  profile= "default"
}

terraform {
  required_providers {
    aws = {
      source = "hashicorp/aws"
      version = "5.43.0"
    }
  }
}
resource "aws_s3_bucket" "terraform-state-unique-bucket" {
  bucket = "terraform-state-unique-bucket"
  # To allow destruction of a non-empty bucket
  force_destroy = true
}

resource "aws_s3_bucket_versioning" "terraform-state-file" {
  bucket = aws_s3_bucket.terraform-state-unique-bucket.id
  versioning_configuration {
    status = "Enabled"
  }
}

Now, to initialize the Terraform code, use the following command:
terrafrom initTo provision the S3 bucket, use the following command:
terraform applyNow, the bucket will be created in S3 and we can see the bucket in the console.

Step#2:Create a DynamoDB Table using Terraform
“Now, we’ll create a DynamoDB table called ‘state_lock_table’ using Terraform to implement the crucial state locking functionality.”
Dynamodb_table.tf
provider "aws" {
  region = "ap-south-1"
  profile= "default"
}

terraform {
  required_providers {
    aws = {
      source = "hashicorp/aws"
      version = "5.43.0"
    }
  }
}

resource "aws_dynamodb_table" "state_lock_table" {
  name           = "terraform_state__unique_lock"
  billing_mode   = "PAY_PER_REQUEST"
  hash_key       = "LockID"
  attribute {
    name = "LockID"
    type = "S"
  }
}

In DynamoDB, you have two billing modes available: PROVISIONED and PAY_PER_REQUEST. PAY_PER_REQUEST allows you to pay based on actual read and write requests, ideal for flexible scaling based on usage.
The ‘hash_key = “LockID”‘ line defines the partition key (or hash key) for the DynamoDB table, uniquely identifying each item. Here, ‘LockID’ is set as the partition key with the data type ‘type = “S”‘ indicating a string data type.
Now, proceed to initialize and deploy the Terraform code to implement these configurations.
terraform init
terraform apply
To see the Database, open DynamoDB and choose the Tables tab.

Step#3:Create Terraform Backend Configuration
Now that the S3 bucket and DynamoDB table are set up, we can proceed to test remote state management using an EC2 provisioning example in Terraform.
There are multiple approaches to implementing remote state in your Terraform configuration.
Let’s explore each method in detail
Method#1:Add configuration block inside the Terraform code
In this method, you have to add the remote backend configuration in the main.tf file where you have the resource declarations.
main.tf
provider "aws" {
  region = "ap-south-1"
  profile= "default"
}

terraform {
  required_providers {
    aws = {
      source = "hashicorp/aws"
      version = "5.43.0"
    }
  }
}
# Launch the EC2 instance
resource "aws_instance" "terraform-state-test" {

  ami = "ami-007020fd9c84e18c7"
  instance_type = "t2.micro"  # Adjust instance type as needed
  key_name = "Apache_kafka_key"
}

terraform {
  backend "s3" {
  bucket = "terraform-state-unique-bucket"
    dynamodb_table = "terraform_state__unique_lock"
    region = "ap-south-1"
    key = "stag/ec2.tfstate"
    encrypt = true
  }
}
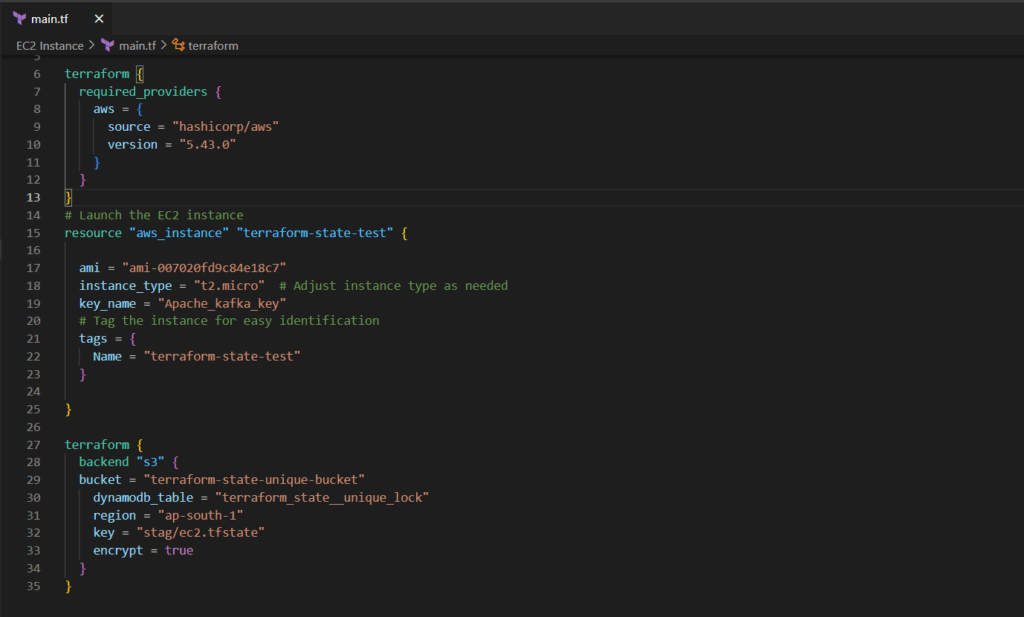
In the Terraform configuration, the first block, highlighted in bold, represents the backend configuration. This configuration specifies that the state files will be stored in an S3 bucket. Additionally, it sets up state locking using a DynamoDB table.
When managing multiple environments like stage,dev, prod, and test it’s recommended to organize them into separate directories to keep the state files organized in the S3 bucket. In the backend configuration, the ‘key’ parameter specifies the directory and custom state file name, such as ‘stag/ec2.tfstate‘. Here, ‘stag’ is the directory name, and ‘ec2.tfstate‘ is the state file name, enhancing clarity and organization.
Now, let’s proceed to deploy an EC2 instance using this configuration with the S3 backend and state locking enabled to validate the remote state management.
terraform init

terraform plan
terraform apply
Check the S3 bucket to ensure that the state file is stored in the Bucket.
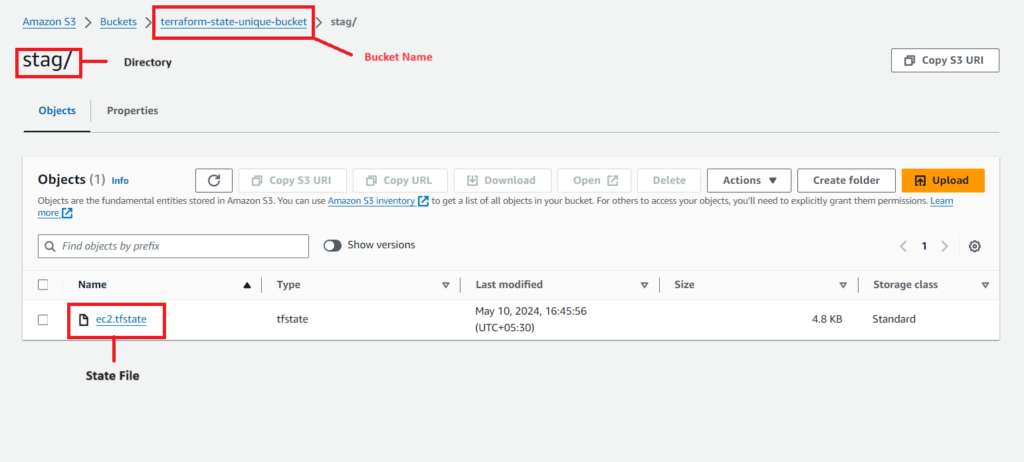
After the state file is stored in the S3 bucket, subsequent executions of Terraform commands like ‘plan’ or ‘apply’ will retrieve the state from the bucket. Upon completion of the execution, Terraform updates the current state in the bucket as a new file.
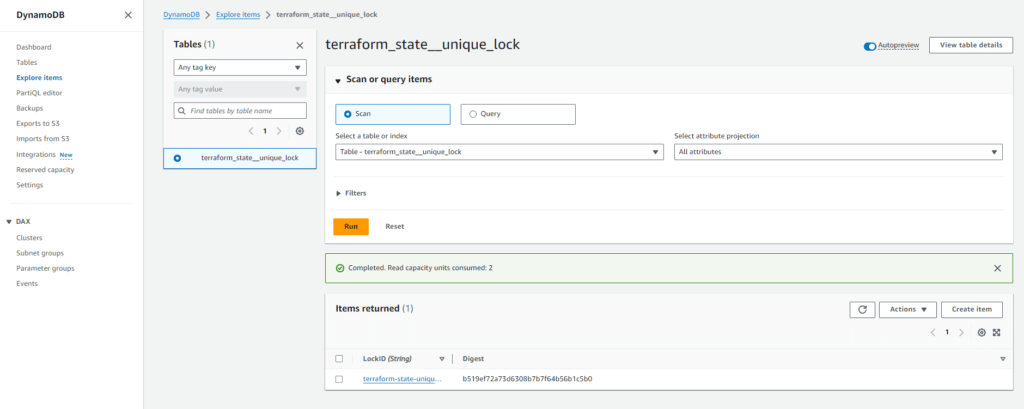
To view the lock entry data in the DynamoDB table, you can use the ‘Explore Table Items’ option, allowing you to inspect and manage the state locking information directly from the DynamoDB console.
Clean up the instance.
terraform destroyYou can also keep the backend configuration separate! Just put it in a file named backend.tf next to your main.tf file, and Terraform will find it automatically.
backend.tf
terraform {
  backend "s3" {
  bucket = "terraform-state-unique-bucket"
    dynamodb_table = "terraform_state_unique_lock"
    region = "ap-south-1"
    key = "stag/ec2.tfstate"
    encrypt = true
  }
}
Method#2:Dynamic Backend Parameters with terraform init
In real-world projects, dynamically passing backend parameters in Terraform configurations is essential for flexibility. By doing so, you can adjust the remote state file location, environment names, and other parameters at runtime based on specific requirements. Simply add the backend block in the Terraform configuration file with only the backend type specified.
main.tf
provider "aws" {
  region = "ap-south-1"
  profile= "default"
}

terraform {
  required_providers {
    aws = {
      source = "hashicorp/aws"
      version = "5.43.0"
    }
  }
}
# Launch the EC2 instance
resource "aws_instance" "terraform-state-test" {

  ami = "ami-007020fd9c84e18c7"
  instance_type = "t2.micro"  # Adjust instance type as needed
  key_name = "Apache_kafka_key"
}

terraform {
  backend "s3" {
    region = "ap-south-1"
  }
}
The remaining backend information will be given with the terraform initialization command as given below.
terraform init -migrate-state

After the initialization, you can directly perform terraform apply or terraform destroy command.
Step#4:Terraform State Versioning Test
We’ve stored the Terraform state file for the EC2 deployment in the S3 Bucket. To demonstrate state versioning, we’ll make a modification to the EC2 resource by adding an instance tag.
main.tf
provider "aws" {
  region = "ap-south-1"
  profile= "default"
}

terraform {
  required_providers {
    aws = {
      source = "hashicorp/aws"
      version = "5.43.0"
    }
  }
}
# Launch the EC2 instance
resource "aws_instance" "terraform-state-test" {

  ami = "ami-007020fd9c84e18c7"
  instance_type = "t2.micro"  # Adjust instance type as needed
  key_name = "Apache_kafka_key"
  #Tag the instance for easy identification
  tags = {
    Name = "terraform-state-test"
  }

}

terraform {
  backend "s3" {
    region = "ap-south-1"
  }
}
Initialize and apply the Terraform code.
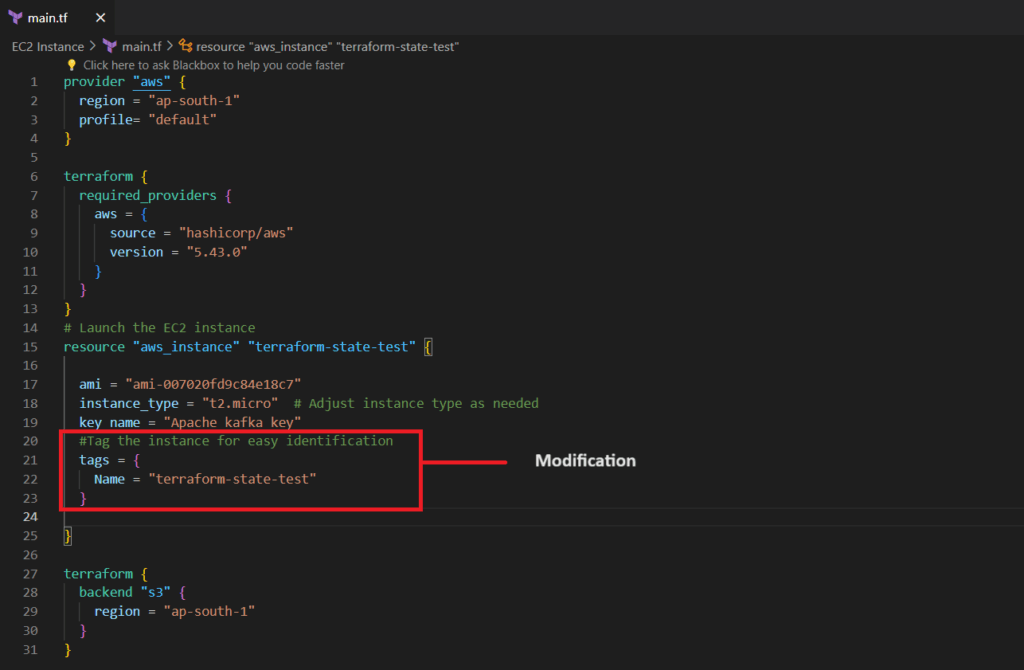

Now, the state file will be modified. We can check the state file versions from the S3 Bucket as shown below.

Enabling versioning allows for easy retrieval of previous state versions when needed, enhancing state file management in AWS S3.
Conclusion
In conclusion, Terraform state locking using DynamoDB (Lock ID) and S3 Bucket provides robust concurrency control and data integrity, essential for collaborative and production environments.
Reference:-
For reference visit the official website .
Any queries pls contact us @Fosstechnix.com.
Related Articles:
How do you provide some kind of Auditing with this backend type?
Ism using exactly the same backend.
I saw in the lockfile all the needet informarions but after the look is done it is gone.
Im very intrestet to use this as a audit log that you can see who has made what.
Do you know something like that with this backend?